
Composting at Home: Turning Kitchen Scraps Into Garden Gold
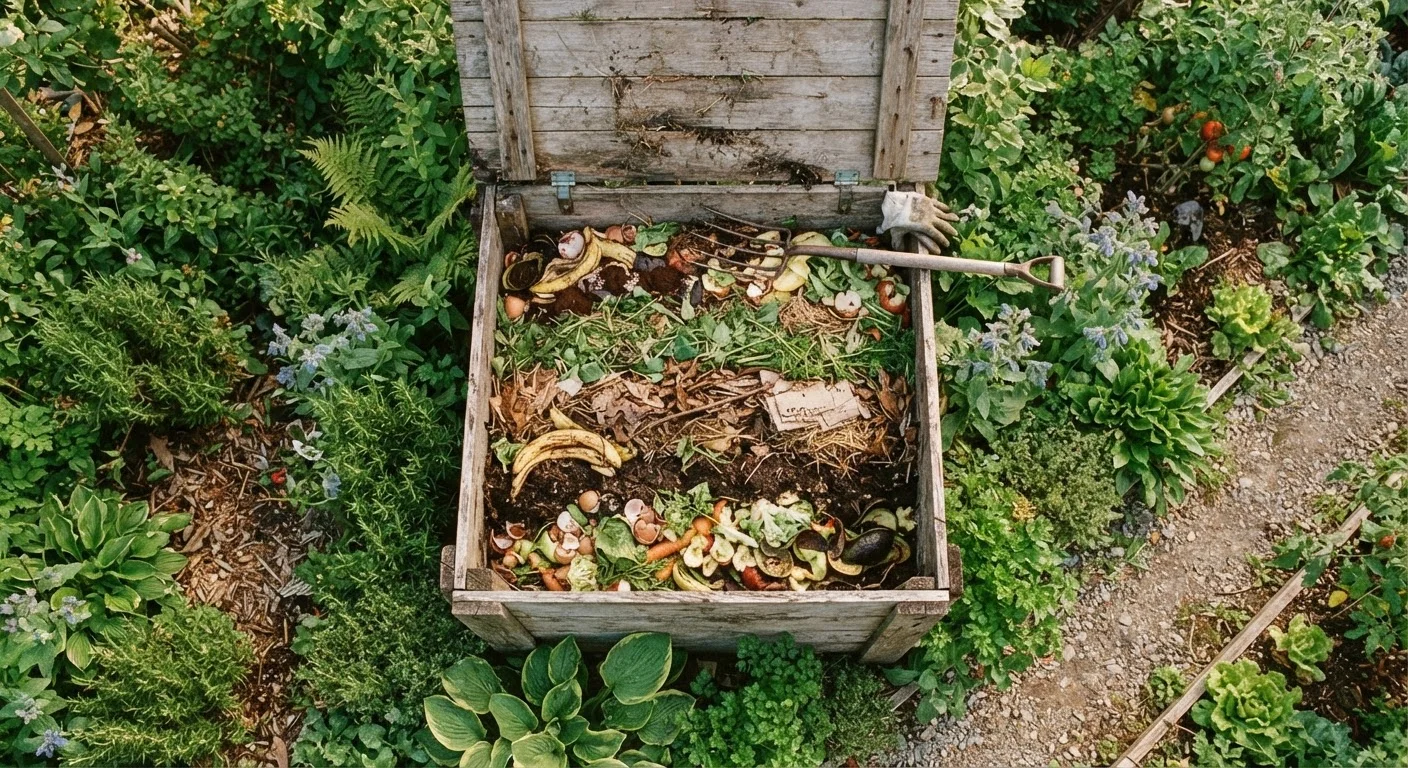
Photo credit: ProximityFinds.com | One-stop Reading Source
In this article
Composting reduces waste and feeds your soil naturally. Follow this practical guide to start a compost pile that actually works.
Key Takeaways
- Compost requires a balance of carbon-rich "browns" and nitrogen-rich "greens" to decompose effectively.
- A pile that is too wet, too dry, or poorly aerated will stall - moisture and turning are essential.
- Most kitchen scraps and yard waste qualify as compostable; meat, dairy, and oily foods should be excluded.
- Finished compost is dark, crumbly, and smells earthy - ready to mix into garden beds or containers.
- A small bin or pile can produce usable compost in as little as two to three months with active management.
Why Composting Is Worth Your Time
Composting is one of the simplest and most impactful things a homeowner can do for their soil. Finished compost improves drainage in clay soils, helps sandy soils retain moisture, feeds beneficial soil organisms, and slowly releases nutrients that plants can actually use - without the risk of burning roots that synthetic fertilizers sometimes carry. If you are starting a new garden, building a compost habit from day one means you will have a free, renewable source of soil amendment that gets better every season.
Beyond garden benefits, composting diverts organic waste from landfills, where food scraps decompose anaerobically and release methane. The EPA estimates that food and yard trimmings together make up a significant share of municipal solid waste - most of which could be composted instead. What goes out as a vegetable peel comes back as something genuinely valuable.
Before you begin, it helps to understand what kind of soil you are working with. Adding compost to poor or compacted soil offers dramatic results; even healthy soil benefits from regular amendments.
What you will need
What You Will Need
You do not need expensive equipment to compost successfully. The materials listed below cover everything from the physical setup to day-to-day management. A simple wire cage or wooden pallet enclosure works just as well as a manufactured bin - what matters is the biology inside, not the container.
Compost bin or enclosure
Contains the pile, retains moisture, and discourages pests; a DIY wooden frame or wire cage works as well as any commercial option.
Pitchfork or garden fork
Used to turn and aerate the compost pile, which introduces oxygen and speeds decomposition.
Kitchen scrap collector (small bin with lid)
Holds vegetable peels, coffee grounds, and other food scraps on the countertop until you carry them to the outdoor pile.
Compost thermometer
Measures internal pile temperature so you can confirm active decomposition and know when to turn.
Garden hose or watering can
Used to add moisture when the pile becomes too dry to decompose properly.
Speed Up Decomposition Naturally
Chopping or shredding materials into smaller pieces dramatically increases the surface area available to microbes, accelerating breakdown. A simple way to do this is to run a lawnmower over fallen leaves before adding them to the pile. Smaller particles also help maintain even moisture distribution throughout the bin.
Step-by-Step: Building and Managing Your Compost Pile
Follow the steps below in order for your first setup. Once the pile is established, ongoing maintenance is largely a matter of adding material in balanced proportions and turning regularly. Most homeowners find that composting takes less than 10 minutes per week once the routine is established.
Never Compost These Materials
Meat, fish, dairy products, bones, and cooked foods containing oils or fats should never go in a home compost pile. These materials attract pests, create odors, and may introduce pathogens. Pet waste and diseased plant material should also be kept out of the pile to avoid spreading harmful bacteria or fungi to your garden.
Choose and set up your composting location
Select a spot that is convenient to reach from the kitchen and receives partial sunlight. Full shade slows decomposition; full sun dries the pile too quickly. A level area with good drainage works best - avoid low spots that collect standing water. Position your bin or mark a 3-foot-by-3-foot area for an open pile, which is the minimum size needed to generate the internal heat that drives decomposition.
Gather your "greens" and "browns"
Successful composting depends on balancing two categories of material. Greens (nitrogen-rich) include fruit and vegetable scraps, coffee grounds, fresh grass clippings, and tea bags. Browns (carbon-rich) include dry leaves, cardboard torn into pieces, newspaper, straw, and wood chips. A general guideline is roughly two to three parts browns to every one part greens by volume. Too many greens produce a slimy, smelly pile; too many browns produce a pile that barely breaks down.
Build the initial pile in layers
Start with a 4-inch layer of coarse browns - sticks, wood chips, or torn cardboard - directly on the ground to allow airflow from below. Add a 2-inch layer of greens on top, then cover with another layer of browns. Continue alternating layers as you add material over the following days. Burying fresh food scraps in the center of the pile rather than leaving them on the surface discourages flies and odors.
Maintain moisture and aeration
Check moisture every few days, especially during hot or dry weather. If the pile feels dry and crumbly, add water with a hose or watering can. If it smells like ammonia or looks slimy, it is too wet - add more browns and turn it. Turn the entire pile every one to two weeks using a pitchfork, moving material from the outer edges into the center. Turning introduces oxygen, which fuels the aerobic bacteria doing most of the decomposition work.
Troubleshoot common problems
A well-managed pile rarely smells unpleasant. If yours does, the most common causes are too many greens (fix: add more browns), insufficient turning (fix: aerate), or excluded materials that snuck in. If the pile is not heating up, it likely needs more greens, more moisture, or smaller-sized materials. If pests are getting in, make sure food scraps are always buried and consider switching to a fully enclosed bin with a lid and floor.
Harvest and use your finished compost
Compost is ready when the original materials are no longer recognizable and the result is dark, crumbly, and earthy-smelling - similar in texture to rich garden soil. This typically takes two to six months depending on how actively you manage the pile. Stop adding new material to one section of the pile and allow it to finish while you start a fresh section. Apply finished compost 1 to 2 inches deep over garden beds, work it into the top few inches of soil, or blend it into potting mixes for container gardens.
Common Myths and Honest Expectations
Compost does not have to smell bad, attract rats, or take years - but it also will not work on complete autopilot. The pile needs balanced inputs, moisture, and airflow. If any one of those is missing, decomposition slows or stops. For a deeper look at advice that sounds reasonable but does not hold up in practice, see our article on garden myths that mislead new gardeners.
Avoid Weeds That Have Gone to Seed
Adding weeds that have already produced seed heads to your compost pile risks spreading those weeds throughout your garden when you apply the finished compost. Unless your pile consistently reaches high internal temperatures (above 130°F), it is safer to bag and discard seedy weeds separately.
Patience helps in the early weeks. The first turn or two may reveal that materials are decomposing unevenly - that is normal. Adjust moisture, particle size, or the green-to-brown ratio, and the pile will find its rhythm. Once you see steam rising from the center after turning, you will know active decomposition is underway. From that point, your garden soil is only a few months away from a meaningful upgrade.

Author
Home Editorial Team
Home Editorial Team is the collective byline for our editorial team and contributor network. Articles published under this byline or an editorial pen name are researched, written, and reviewed according to our editorial standards for clarity, consistency, and independence before publication.
View all articles →